Running an Extraction
Lift Off adapts to your starting point. Start from a live QuickBooks company file for the five-step flow — Extract → Bank Statements → Review → Upload → Convert — or load a previously extracted snapshot or Migration Package to jump straight to Bank Statements and Review.
Choosing a source
In the Setup wizard, select your source type:
| Source | When to use |
|---|---|
| QB Desktop | Full extraction from a live QuickBooks company file (Windows only). Runs all five steps. |
| Snapshot | Load a previously extracted .ndjson.gz snapshot or a .migr8.pivoten.zip Migration Package. Skips Steps 1–2 and starts at Verify. |
On macOS, click Create Workspace to create a workspace at ~/Documents/Lift Off/ automatically — no folder picker is shown. Remember a Mac can only verify and upload a snapshot already extracted on Windows — it cannot extract (see System Requirements → macOS).
Reopening a folder with prior data
If you Browse… to a folder that already has a LiftOff extraction in it, the app asks before opening it — "This folder already has migration data" — naming the company, record count, and when it was extracted. Choose Resume this migration to continue that work, or Choose a different folder… to pick somewhere else. This only applies to a brand-new folder picked via Browse; reopening a workspace from Recent always resumes immediately, since that's your own in-progress work.
Before you start — customer checklist
Hand this list to the customer (or work through it together) before running an extraction. Reports are pulled from QuickBooks automatically by Lift Off — no manual export is required. The bank & credit-card reconciliation PDFs are an optional attachment for the one figure QuickBooks won't hand the tool (statement ending balances); pulling your own report PDFs is also optional but recommended as an independent cross-check at sign-off.
1. Pick and freeze a cutover date. Decide the "as of" date the migration represents — usually the last day of the most recently closed period. Every balance (Trial Balance, AR/AP aging, inventory, bank reconciliation) is captured as of this date. Avoid entering or back-dating transactions dated on or before the cutover once the extraction has run; if you do, re-run the extraction so the snapshot stays current. Note that the cutover is separate from the extraction date range in Setup: leave that range blank (the default) so the snapshot captures all history — Lift Off is a complete backup, and setting a range excludes everything outside it. Lift Off warns you if a range is set.
2. Get the company file ready (Windows). Extraction runs on the Windows PC where QuickBooks Desktop and the company file (.qbw) live. Sign in as the Admin user, switch to Single-user Mode (File → Switch to Single-user Mode), and confirm the file opens cleanly. Running File → Utilities → Verify Data first is recommended — it catches file corruption before it becomes a migration problem. By default Lift Off extracts from whatever company file QuickBooks currently has open (the Use the company file open in QuickBooks option in Setup), so just make sure the correct company is open in QuickBooks before you start. To point it at a specific file instead, turn that option off and Browse to the .qbw.
3. Export the bank & credit-card reconciliation reports — optional (recommended). Lift Off captures each transaction's cleared status automatically, but the statement ending balances are the one set of numbers QuickBooks will not hand the tool.
For each bank and credit-card account: Reports → Banking → Previous Reconciliation → choose the account → select the most recent statement → Display → save as PDF. Attach one file per account on the Bank Statements step (and optionally let Lift Off read the balances from the PDF). These provide the statement ending balances the extractor cannot read, so your first reconciliation after migration starts from the right place. They are optional — you can continue without them.
4. (Recommended) Export reference PDFs for sign-off. Lift Off fetches the reports below automatically, but pulling your own PDF copies — dated to the cutover date — lets you check the Migration Readiness Report against QuickBooks' own numbers and sign off with confidence. Set each report's date to the cutover date; for the period reports (Profit & Loss, Sales by Item, Journal), set the range from the start of history through the cutover date.
| Report | QB menu path | What it confirms |
|---|---|---|
| Trial Balance | Reports → Accountant & Taxes → Trial Balance | Every account's ending debit/credit balance |
| Balance Sheet Standard | Reports → Company & Financial → Balance Sheet Standard | Asset / liability / equity balances |
| Profit & Loss Standard | Reports → Company & Financial → Profit & Loss Standard | Income / expense for the period |
| A/R Aging Detail | Reports → Customers & Receivables → A/R Aging Detail | Open customer balances |
| A/P Aging Detail | Reports → Vendors & Payables → A/P Aging Detail | Open vendor balances |
| Open Invoices | Reports → Customers & Receivables → Open Invoices | Line-level open AR |
| Unpaid Bills Detail | Reports → Vendors & Payables → Unpaid Bills Detail | Line-level open AP |
| Inventory Valuation Summary | Reports → Inventory → Inventory Valuation Summary | Per-item asset value (inventory only) |
| Sales by Item Summary | Reports → Sales → Sales by Item Summary | Per-item revenue (items only) |
| Journal | Reports → Accountant & Taxes → Journal | QuickBooks' own debit/credit posting view |
5. After extraction, review the readiness report. Step 3 (Verify) opens with an in-app readiness report — read the verdict at the top, work through anything under What needs attention, and follow the Clean these up in QuickBooks, then re-extract steps if any are listed. Use the Download PDF and Print / PDF buttons at the top of the step to get the report out — Download PDF saves it as a real PDF file (falls back to HTML if Microsoft Edge isn't installed standalone on this machine), and Print / PDF opens it in your browser to print or Save as PDF (handy for emailing a copy). Compare its balances against the PDFs from step 4, and raise any variance you can't explain with your Pivoten contact before uploading.
Step 1 — Extract (QB Desktop only)
Extraction captures everything automatically — there is no manual "gather reports" step. For reference, Lift Off fetches the following reports straight from QuickBooks during the run (no manual export needed); they give Pivoten the data to verify the migration and reconcile balances:
| Report | QB menu path | Required? |
|---|---|---|
| Trial Balance | Reports → Accountant & Taxes → Trial Balance | Auto-fetched |
| Check Reconciliation | Reports → Banking → Previous Reconciliation | Optional (override) |
| AR Aging Detail | Reports → Customers & Receivables → A/R Aging Detail | Auto-fetched |
| AP Aging Detail | Reports → Vendors & Payables → A/P Aging Detail | Auto-fetched |
| Retained Earnings Detail | Reports → Company & Financial → Statement of Retained Earnings | Auto-fetched |
| Inventory Valuation Summary | Reports → Inventory → Inventory Valuation Summary | Auto-fetched |
| Open Invoices | Reports → Customers & Receivables → Open Invoices | Auto-fetched |
| Unpaid Bills | Reports → Vendors & Payables → Unpaid Bills Detail | Auto-fetched |
| Profit & Loss (by year) | Reports → Company & Financial → Profit & Loss Standard | Auto-fetched |
| Balance Sheet (by year) | Reports → Company & Financial → Balance Sheet Standard | Auto-fetched |
| Sales by Item | Reports → Sales → Sales by Item Summary | Auto-fetched |
| General Journal | Reports → Accountant & Taxes → Journal | Auto-fetched |
Retained Earnings Detail: Fetched automatically from QuickBooks during extraction via the QBXML general ledger API — no manual export needed. This captures the equity accounts' opening balances and posted activity. Note that QuickBooks' year-end closing entries are virtual — QB computes them on the fly to display Retained Earnings and current-year Net Income and does not expose them through any QBXML report — so Pivoten reconstructs the correct Retained Earnings balance from the full General Ledger and each fiscal year's net income rather than from closing entries.
Trial Balance: Fetched automatically from QuickBooks during extraction — no manual export needed. Lift Off fetches a separate Trial Balance for each fiscal year that actually contains transactions (the year range is derived from the data, so empty leading years are never requested), as of each year's fiscal year-end — which Lift Off reads from the company file and is not assumed to be December 31. This gives Pivoten year-by-year balance data for a cleaner migration. If you need to override it, click Override and attach a CSV, XLS, or XLSX file.
AR Aging / Open Invoices / AP Aging / Unpaid Bills: Fetched automatically as of the extraction end date for the reconciliation cross-check. The Migration Readiness Report cross-checks these two pairs against each other (they should agree) and shows the reconciler's computed AR/AP balance as a reference estimate. These same reports are also captured as of each fiscal year-end as part of the by-year report archive (below), so you can see what was open at any prior year-end.
Profit & Loss, Balance Sheet: Fetched for each fiscal year that contains data, aligned to the company's fiscal year-end (not assumed to be December 31). Stored in the snapshot and rendered in the Migration Readiness Report as reference data for validating the income/expense and asset/liability sides of the migration.
Sales by Item: Fetched for the full extraction date range. Stored in the snapshot and rendered in the Migration Readiness Report to support item-level revenue mapping validation.
General Journal: Fetched per fiscal year (using the company's fiscal-year start and the earliest transaction date) — QuickBooks' own debit/credit view of every transaction. It is fetched year by year rather than all-at-once because a single multi-decade Journal overflows QuickBooks' report engine on large company files. The Migration Readiness Report confirms the journal's total debits equal its total credits and lists per-account debit/credit activity, giving Pivoten the authoritative figures to balance the migrated General Ledger against.
Inactive / archived records are included. Every list Lift Off reads — the chart of accounts, items (including sales-tax and subtotal items), customers, vendors, employees, classes, price levels, sales reps, payment methods, ship methods, terms, currencies, units of measure, payroll items, and more — is fetched with all entries, active and inactive. This is required, not optional: a transaction from years ago often references an account, item, or name that has since been made inactive (QuickBooks does not allow deleting a list entry that any transaction uses — it makes it inactive instead). Pulling the full list ensures every historical transaction line resolves and the migration balances. For each account, Lift Off keeps its full detail — the original QuickBooks number exactly as entered (even when it's blank or non-standard), its parent/sub-account hierarchy, and its Tax-Line Mapping — so nothing about the chart is lost; any fitting to a target system's limits happens later, at conversion, never to the captured data.
Each record is captured in full. Beyond the headline fields, Lift Off keeps the complete record for every entity: all addresses (structured and the exact as-printed address block), every additional contact, the full dated note history, custom fields, the QuickBooks external ID, and each transaction's QuickBooks transaction number. Employee records include employment details and payroll setup (pay schedule, wage items, and sick/vacation accrual) plus the HR and demographic fields QuickBooks holds.
Because the snapshot is a faithful, complete backup, it includes sensitive personal data QuickBooks stores — employee Social Security numbers and, where present, demographic/EEO fields (date of birth, gender, ethnicity, disability, veteran/military status) and work-authorization details. Store, transmit, and retain the snapshot and Migration Package accordingly. Raw payment-card numbers and authorization data are deliberately not captured.
Bank & Credit Card Reconciliation: Each bank and credit-card transaction's cleared status (cleared, uncleared, or pending) is captured during extraction. The Migration Readiness Report adds a Bank & Credit Card Reconciliation section showing, per account, the uncleared ("in transit") amount as of the extraction date — what will appear outstanding on your first reconciliation after migration. This complements the Check Reconciliation files you attach in Step 1, which provide the statement-level ending balances that QuickBooks does not expose to the extractor. As an additional archive, Lift Off also captures a bank transaction cleared-status report (Transaction Detail by Account, with the cleared-status column) for each fiscal year — the closest substitute available, since QuickBooks' actual reconciliation reports and statement balances are not exposed through its data API at all and remain a manual export.
Complete by-year report archive: Beyond the reports above, Lift Off captures a set of QuickBooks reports for every fiscal year that contains data, so the snapshot is a complete backup you can always review without reopening QuickBooks. For each fiscal year it stores: the summary financial statements (Trial Balance, Profit & Loss, Balance Sheet — kept as typed rows), the General Journal, A/R and A/P Aging (both detail and summary), Open Invoices and Unpaid Bills, Inventory Valuation, Sales Tax Liability, Sales by Item / Sales by Customer / Purchase by Vendor, 1099 Detail, the bank cleared-status report above, and payroll reports when the company runs QuickBooks payroll. These are stored faithfully as generic report grids (snapshot entity type report-capture), paged across records so no single report can overflow the reader. The full-detail statement reports (General Ledger, Balance Sheet Detail, P&L Detail, Customer/Vendor Balance Detail) are intentionally not captured as year-end grids: they re-render every transaction back to inception, balloon year over year, and duplicate what the snapshot already holds in full as structured transactions plus the General Journal. Any report QuickBooks cannot return for a given year is recorded as skipped (see below) rather than silently omitted, so a partial backup never looks complete.
Snapshot integrity check: Immediately after the snapshot is written, Lift Off re-opens and streams the whole file, confirming it decompresses cleanly and that its record counts match the manifest. A truncated or corrupted file is flagged in the result (and in the run history) rather than being delivered as a complete backup.
What QuickBooks can't export: A small set of things are not available through QuickBooks' data API at all — most notably bank reconciliation reports/statement balances (the optional PDF above) and document attachments. See docs/qbxml-limitations.md for the complete, honest list of what can and cannot be captured, and how each gap is handled.
Bank statement balances: The one figure QuickBooks won't expose is each account's statement ending balance. It's collected later, as a clear optional step on the Upload screen — nothing needs to be attached in order to extract.
Running the extraction
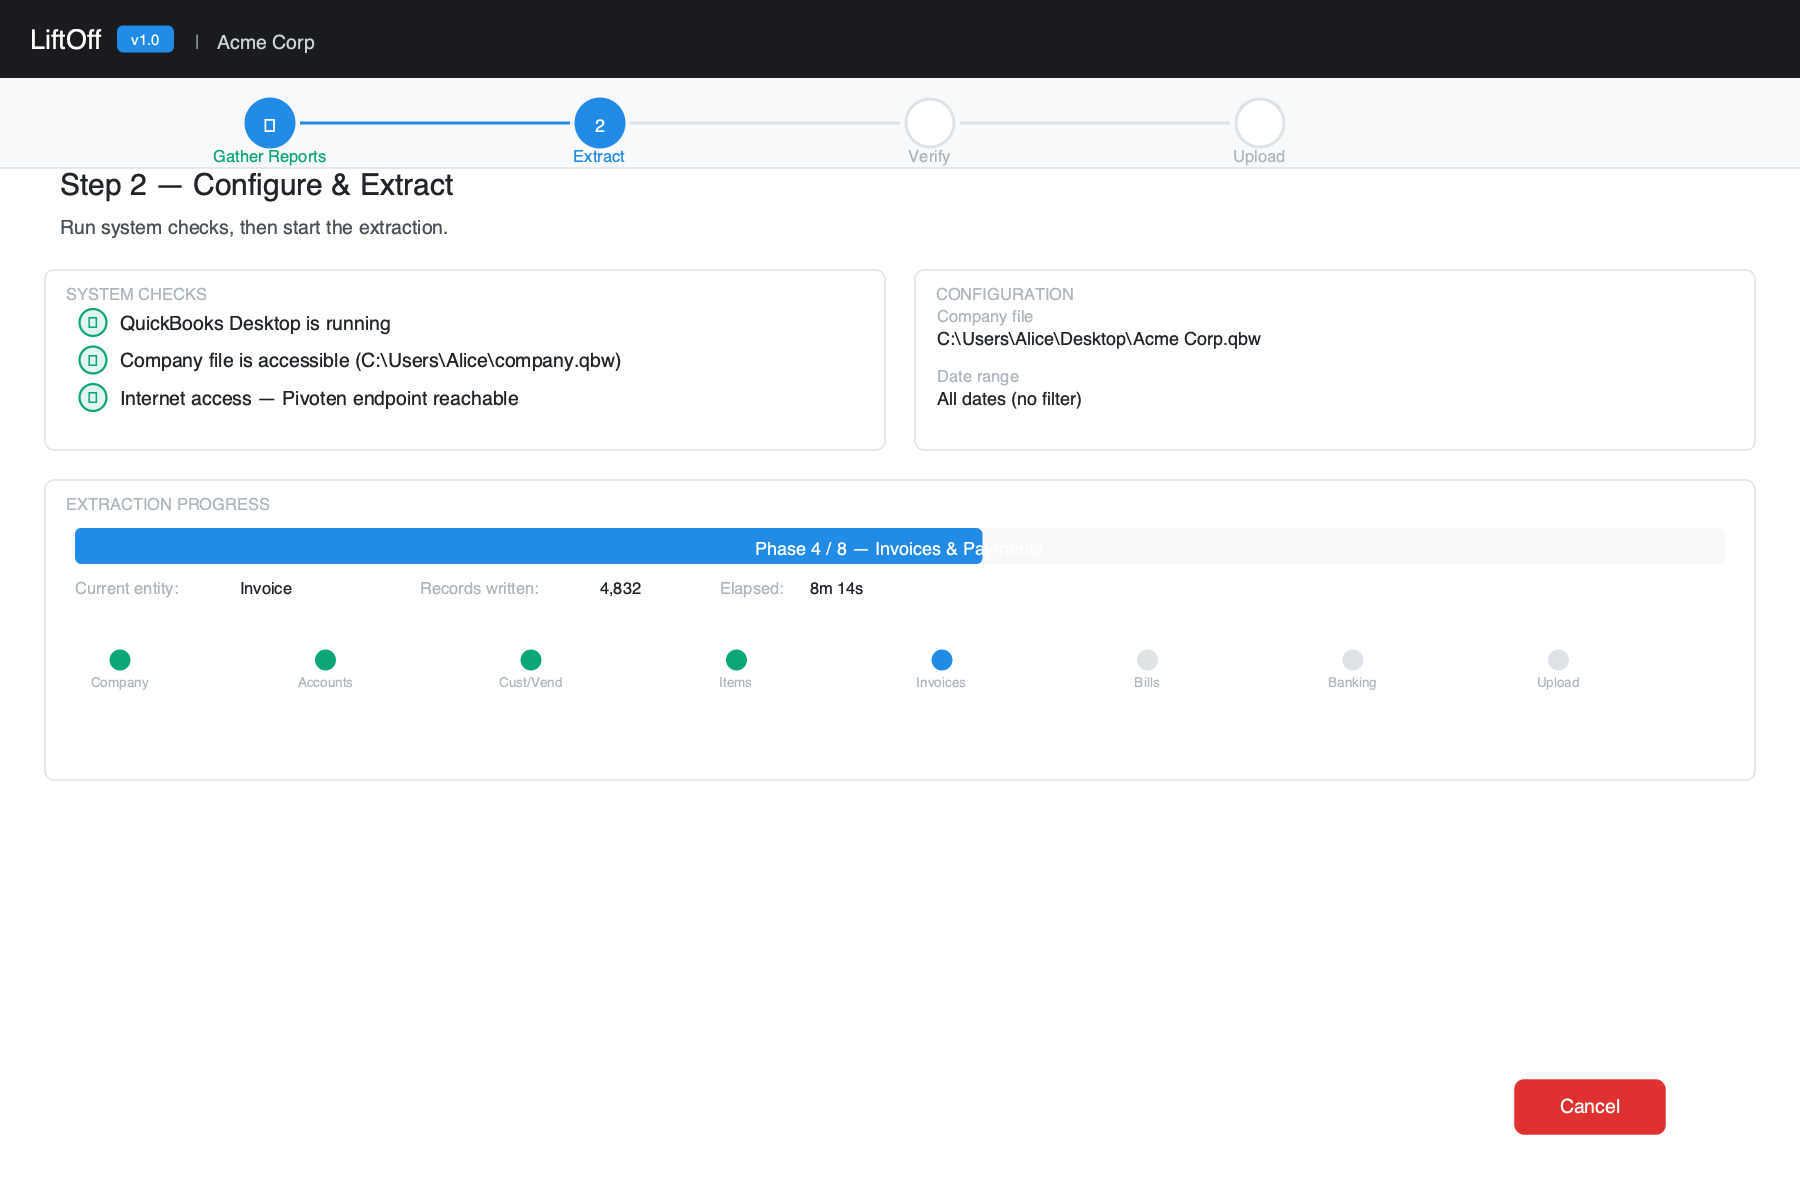
The extraction panel shows System Checks at the top. All three must pass before extraction can begin:
| Check | What it verifies |
|---|---|
| QuickBooks Desktop | QuickBooks is running on this computer |
| Company File | The configured .qbw file exists and is readable |
| Internet Access | Your computer can reach Pivoten's upload endpoint |
If a check fails, a suggested fix appears below it. Click Check again after resolving the issue.
Once checks pass, click Start Extraction. Lift Off will:
- Connect — Open a QBXML session with QuickBooks. On first connection, QuickBooks may show a permission dialog — click Yes, always allow access to grant permanent access.
- Extract — Read all QuickBooks data in dependency order: lookup tables first, then name lists and items, then transactions. A progress bar shows the current phase, entity type, and record count. (Paychecks aren't queried individually — QuickBooks exposes no paycheck query — but their postings are captured in full through the General Journal, so they still tie out in the balance check.)
- Package & upload — Fetch a Trial Balance, Profit & Loss, Balance Sheet, AR/AP Aging, Open Invoices, Open Bills, Inventory Valuation, Sales by Item, and the General Journal from QuickBooks — then compress everything into a snapshot file and upload to Pivoten. Large snapshots upload in chunks automatically — no action required on your part.
Do not close QuickBooks while an extraction is in progress. Closing QB will interrupt the QBXML session and fail the extraction. You can continue using QB normally, though it may feel slower.
Lift Off saves a checkpoint after each completed entity type. If the extraction is cancelled or fails mid-run, clicking Start Extraction again resumes from the last successful step. Checkpoints are kept for 48 hours. Clicking Cancel during a run asks you to confirm before stopping — completed steps stay saved, so you can resume later.
While an extraction is running, Reconfigure extraction and Switch workspace are disabled in the workspace menu, and the sign-out button is unavailable. You must cancel the extraction first before changing workspaces or reconfiguring. If you close and reopen the app while an extraction is running, Lift Off automatically returns you to the Extract step so you can monitor progress.
Loading a Snapshot or Bundle (Snapshot source only)
When your source type is Snapshot, the first step shows a file picker in place of the Extract panel.
- Select a
.ndjson.gzsnapshot file, or a.migr8.pivoten.zipMigration Package (see Migration Package below). - Click Load Snapshot. Lift Off reads the manifest, validates the file, and advances to the Bank Statements step.
No QB connection is needed. This path is typically used to verify and upload a snapshot on macOS after extracting on a Windows machine.
Step 2 — Bank Statements
Right after extraction, Lift Off lists every bank and credit-card account it found and asks you to record each one's latest statement — the figures QuickBooks does not expose to the data API, which set the baseline for your first reconciliation after go-live. For each account you can enter the statement date, the beginning and ending balance, and (optionally) the total deposits and withdrawals. Each account shows its current book (GL) balance and how much is uncleared (in transit) for context.
Read the PDF for you (optional). Attach a statement PDF and click Read PDF: Lift Off extracts the text and tries to recognize the balances, statement date, and totals, pre-filling the fields for you to verify. It's best-effort — bank layouts vary and scanned-image PDFs have no readable text — so always confirm the numbers, and enter them by hand when the parse can't find them. The whole step is optional; skip any account you don't have a statement for. What you record (and the PDFs you attach) is saved with the workspace and bundled into the Migration Package as reports/bank-statements.json.
Step 3 — Review
After extraction completes (or a snapshot is loaded), the Review step opens with an in-app readiness report that answers, in plain language, how cleanly did my data come over? — and lets you decide whether to clean anything up in QuickBooks and re-extract before finishing. It's the same analysis as the downloadable HTML report, shown right in the app:
- Readiness verdict — one headline (Your QuickBooks data came over cleanly / Almost there — a few things worth reviewing / A few things to fix before this is a reliable archive) over a scorecard: records captured, whether the books balance, the unexplained amount, and how many accounts were verified against the Trial Balance.
- What we checked — a plain-language checklist (books balance, Trial Balance coverage, balance-sheet tie-out, item lines with no account, and more), each marked pass, review, or action.
- What needs attention — the specific items behind any unexplained residual, each tagged by who resolves it: A = Pivoten fixes it in code, B = your decision, C = fix in QuickBooks. Each line says exactly what to do. On a B item you can record your decision right there: Accept as-is (with an optional note) marks it as consciously accepted — the verdict and the unexplained gate stop waiting on it, while its dollar amount stays visible on the report — and Reopen takes the acceptance back. The decision is saved with the amount you saw, so if a later re-extract changes that amount, the item automatically reopens for a fresh look. Decisions travel inside the migration package.
- Clean these up in QuickBooks, then re-extract — when fixing something at the source would give a cleaner archive (an out-of-balance file, items missing an account, an incomplete snapshot), Lift Off lists those steps and offers Re-extract after fixing. None are required to continue — but doing them is how you reach a complete archive and stop relying on QuickBooks Desktop with confidence.
- Show technical detail — expands the rebuild-readiness buckets (how much line-level detail a conversion reconstructs), the fields recovered (payee on checks, payment→document links), the A/R & A/P cross-checks, and the per-account bank/credit-card cleared-vs-uncleared split.
- Download PDF — saves the complete Migration Readiness Report as a PDF, rendered with a headless copy of Microsoft Edge (falls back to HTML if Edge isn't installed standalone on this machine): the full per-account variance breakdown, the General Ledger reconciliation (QuickBooks transactions that can't be queried individually — paychecks, payroll-tax and sales-tax payments — are completed from QuickBooks' own General Ledger so the books balance), the Equity & Retained Earnings closing-entry plan, an Extraction Statistics count for every data type captured (with anything unlabelled under Other Extracted Data), the coverage period, and the What This Migration Does Not Include list — so there are no surprises at cutover. If any records could not be read (a corrupt or truncated snapshot), both the in-app report and the HTML flag them as ACTION NEEDED rather than silently omitting them.
- Extraction report — record counts for every QuickBooks entity type extracted, total records, company name, and elapsed time.
- Skipped entities — if Lift Off encountered errors on specific entity types, they are listed here. Contact Pivoten support if critical data types were skipped.
Source data cleanup
Below the readiness report, the Review step shows a second, separate report: Source data cleanup. The two answer different questions. The readiness report asks did the extract tie out to QuickBooks? — it only flags a source issue when it breaks the balance. The cleanup report is a proactive best-practices punch list: things worth tidying up in QuickBooks so that both the conversion and the historical archive come out as clean as possible — even when your books already balance. None of it blocks the conversion; it simply makes the result better.
It scans your data for five kinds of cleanup, each with the exact QuickBooks steps to resolve it and the full list of affected records:
- 1099 vendors missing a Tax ID (important) — vendors flagged for 1099 reporting that have no Tax ID. They can't be filed and convert as incomplete vendor records.
- Suspense / uncategorized account balances (important) — money still sitting in "Ask My Accountant", "Uncategorized", "Clearing", or similar accounts. It hasn't been assigned to the right income or expense category, so it distorts the profit & loss and carries that ambiguity into the converted books.
- Negative inventory (important) — items sold before they were recorded as received, so QuickBooks estimated their cost. The inventory asset value and cost of goods sold are wrong and convert as-is.
- Unapplied payments & open credits (recommended) — customer payments and credit memos never applied to an invoice, and unused vendor credits. They leave the accounts-receivable and accounts-payable balances overstated.
- Likely-duplicate names (recommended) — customer or vendor names that differ only by a stray period or extra space, usually the same entity entered twice. Merging them avoids duplicate records in Accounting Manager.
The report is split into two sections so you can focus your effort. Fix before converting lists everything that affects the data actually crossing into Accounting Manager — handle these first. Optional — historical archive lists potential duplicate bills that are dated before your conversion cutover and already paid: they roll into your opening balances rather than crossing as live detail, so cleaning them up only tidies your QuickBooks history and won't change the converted result. (If Lift Off can't determine your conversion window yet, everything appears in a single list.)
Each finding is marked important (distorts the converted books, the archive, or a tax filing) or recommended (hygiene that makes the result cleaner). Click Save checklist to export the whole punch list as a PDF to work down in QuickBooks (falls back to HTML if Microsoft Edge isn't found on this machine). The Migration Package always bundles the HTML form of this report too, so the archive records what was worth cleaning up at extraction time, independent of this save. When there is nothing to fix, the report says so.
This step is advisory — you can proceed to Upload even with warnings (converting to Accounting Manager additionally requires the books to balance). Review both reports and decide whether to clean up and re-extract before continuing.
Step 4 — Upload
The Upload step sends everything to Pivoten. The package already contains your snapshot, the readiness report, and the bank statements you recorded.
Migration Package
The full post-extraction workflow — moving the package to a new computer, verifying integrity, restoring your progress, and building the research database — is on its own page: After the Extract.
Lift Off builds the package automatically the moment extraction finishes. The single Upload to Pivoten button rebuilds it if you attached statement files (or a Trial Balance override) afterward, then sends it. The package is a single, self-contained .migr8.pivoten.zip — the portable unit of truth for the migration. It can be run A-to-Z on one machine, or extracted on a customer's machine and finished on a Pivoten machine; whatever is in the package is everything needed to continue. The package is organized into a clear internal structure:
data/      snapshot (.ndjson.gz) + state.json (machine-readable migration state)
logs/      extraction log and traces
reports/   readiness report (HTML), source-data-cleanup report (HTML),
           migration-summary.json, and the bank/CC reconciliation PDFs and
           Trial Balance override you attached
temp/      scratch
SHA256SUMS     SHA-256 of the snapshot — after unzipping, `sha256sum -c SHA256SUMS`
               (Windows: `certutil -hashfile data\<snapshot>.ndjson.gz SHA256`)
               proves the data is the unaltered original
migration.md   human-readable state — configuration, results, and a process log
               of what was performed where (machine + timestamp)
state.json and migration.md make the package resumable on any machine: the configuration, results, attached reports, and a process log (each milestone stamped with the machine and time it ran on) travel with the data. The same migration.md is also written as a same-named .md file next to the package, so the workspace's state is readable at a glance without opening the archive. The migration-summary.json aggregate remains a no-PII quality metric (entity counts, balance status, variance and cross-check totals, coverage range) with no customer name or file path.
The package lives locally and is also pushed to S3 (best-effort — a failed or offline upload never loses the local copy). It is named by extraction timestamp and company name:
YYMMDDhhmm.migr8.pivoten.CompanyName.zip
For example: 2606181830.migr8.pivoten.Acme_Corp.zip (with 2606181830.migr8.pivoten.Acme_Corp.md alongside it)
The package can be:
- Archived as a complete audit trail of the migration
- Loaded as a Snapshot source on another machine to re-verify or continue the migration
- Shared with the Pivoten team as a self-contained delivery
Re-opening a workspace resumes from the package. When a workspace folder already holds a Migration Package, re-opening that workspace automatically loads it — restoring the data and the conversion decisions made earlier (account numbers, the step you reached) — and lands you on Review/Convert rather than a fresh start. If only a loose .ndjson.gz snapshot is present (no package yet), it resumes from that instead. The package is written into the open workspace folder so this resume is reliable.
Click Upload to Pivoten to send the package to Pivoten's servers (it builds or rebuilds the package first if needed). Once uploaded, a confirmation message appears with the storage key as a reference ID. Any attached statement files and the readiness report travel inside the package, so there is no separate report-upload step. Contact your Pivoten account team to proceed with the migration into Accounting Manager.
Step 5 — Convert
The Convert step writes the Pivoten Accounting Manager database into a Converted Data folder, building it from your QuickBooks data. You choose where it goes here — the destination is a convert-time decision, not something you set up front when extracting. Use Browse… to pick a folder (it defaults to your workspace); the database is written to a Converted Data subfolder inside it.
The template (395 FoxPro files — .dbf, .CDX, .FPT, .dbc) is embedded directly in the Lift Off executable — no internet connection is required and nothing extra needs to be installed.
Click Review & build the AM database to enter the conversion wizard: you review each area (chart of accounts, customers, vendors, opening balances), record your sign-off per step, and the actual write happens at the Verify Setup gate once the reconciliation checks pass and you sign off. While it builds, a progress panel shows each step as it's written — on a large file this can take a few minutes, so keep the app open — and you can Stop the build at any time. Anything already written into the folder is never redone — re-running writes only what's missing, and that progress survives stopping the build or closing the app.
The later Transactions steps (Bills, Invoices, Bank, Journal Entries, and so on) appear in the left rail marked soon — they show the roadmap for what's coming but aren't built yet, so they aren't clickable.
If you change a decision after data was already written — for example, editing a chart-of-accounts number once bills exist in the folder — that folder can no longer be extended, and the gate says exactly what changed (for example, "the carry window changed"). The fix is one click: Start a fresh Converted Data folder continues the build in the next free folder (Converted Data (2), (3), …) and leaves the original folder untouched. The Convert step always shows the exact folder the build currently uses.
Extraction run report
After every successful extraction Lift Off writes a Markdown report file alongside the snapshot, named YYYYMMDD-HHMMSS-<id>.md. It lands in your configured output directory.
The report records:
- Company name, snapshot ID, date range, and elapsed time
- The snapshot's SHA-256 content hash — recorded at extraction time so the file can later be proven to be the unaltered original (it must match the Migration Package's
SHA256SUMS) - Record counts per entity type — the authoritative count of every QuickBooks data type extracted
- Skipped entities (if any), with a pointer to the log file
- Whether the Trial Balance was auto-fetched and how many rows it contained
Keep the run report alongside the snapshot. If questions arise during migration ("why are there only 5,000 invoices?"), the run report is the first thing to check — it tells you exactly what Lift Off saw at extraction time without needing to decompress the snapshot. The Migration Package bundles this information together with the snapshot and HTML readiness report for easy sharing.
How long does it take?
| Company file size | Typical extraction time |
|---|---|
| A few years of history, moderate volume | 15 – 45 minutes |
| Many years of data or high transaction count | 45 minutes or more |
The upload adds a few minutes on top of extraction time, depending on your internet speed.
Troubleshooting
"QuickBooks shows a permission dialog"
On first connection, choose Yes, always allow access so Lift Off does not prompt on subsequent runs.
"QuickBooks Desktop does not appear to be running"
Open QuickBooks Desktop and load your company file, then click Check again on the System Checks panel on the Extract step.
"Cannot access company file"
The path saved in your workspace no longer points to the .qbw file. Use Reconfigure extraction… from the workspace menu (top-right corner) to browse for the file again.
"Cannot reach S3"
Your internet connection is down, or a firewall is blocking outbound HTTPS traffic to s3.amazonaws.com:443. Check your network settings or contact your IT department.
"Extraction fails mid-run"
Click Start Extraction again — Lift Off resumes from the last completed step rather than starting over. If the error recurs on the same step, check the log file path on the error screen and include it when contacting Pivoten support.
"Snapshot file not found" when loading a bundle
Make sure the .zip file is in a location Lift Off can read and is not being blocked by antivirus software. If the bundle was copied from another machine, verify it is fully transferred before opening.
"How do I enable verbose logging?"
Open the workspace menu (top-right corner) and select Enable verbose logging. This writes additional detail to the log file. Disable it after troubleshooting to avoid large log files.
"I closed the app while extraction was running"
Reopen Lift Off — it will detect the in-progress extraction and automatically return you to the Extract step where you can monitor or cancel it. The extraction goroutine continues running in the background as long as the app is open.